Product Realization
For this product development I worked with Mikey, Abby, Harrison, and Joyce from the Design classes. Our initial ideas were a thermos that can prevent burns, a universal paperclip, or a shoelace buckle. After meeting we settled on the Thermos with our initial designs pondering ways to inform the user about the internal temperature of the Thermos.
The first test build was using a conductive material to bridge heat from the inside of the material to the outer. For the proof of concept I constructed a cylinder made to hold a bottle with a steel wire contact attached via a hairband. A rudimentary search stated 45-50 degrees Celsius is the upper limit of what heat humans can handle. When testing with heat I quickly found that the PLA had reached what is called it's glass transition temperature where it is still solid yet has become flexible and malleable, this was also concerning as the hot water leached chemicals from the plastic and started emitting fumes and discolouring the water. I repeated the same attempt with a plastic cola bottle however more resilient it too began deforming from the heat and emitting worse fumes so I cancelled both. In place I tested it with a frozen water bottle attached to the conductive bridge which proved successful.

For week 2 I worked on building some models to work out the general design for fabrication.


What quickly became an issue discussed in the group was material access, price, and food safety. PLA is generally safe but not at high temperatures that would begin to weaken and degrade the material. There are food safe PLAs and PETG however the construction of a 3D printed thermos still had the issue of unsealed walls which would required a high temperature food safe coating. A possible medium was using thermocromatic paint which changes based on temperature however this had the issue of degrading rapidly without Ultra Violet protection as well even a few dozen ounces of the medium at the specified temperature is very expensive. For this reason I felt we simplify the design by using an indent however the other group members were adamant in trying other ideas like a compressible silicon button and combining the conductive material into the chamber so I did some test prints to demonstrate how it would be produced.

I had several concerns with this method. One was designing the 3D model to incorporate the material post print or mid print, second was how to best fuse the inner chamber back around the material, three was making these food safe ontop of accounting for the plastic print, four was this being a fault point for the cup after consistent use either the seal breaking or the material like the silicon simply cracking over repeated heating. As we moved towards a finished production in other materials simplifying the model became more urgent and mixing materials became extremely troubling due to alternating temperatures and different materials expanding and contracting. We wanted to use TPU as it's flexibility would absorb impacts and protect the ceramic from shocks, remember this for later.
We approached my instructor Bryan on if ceramic 3D printing was a possible for the Thermos design which we were informed would be impossible as ceramic slip requires exponentially more time to dry and become stable than Plastic takes to cool almost instantaneously and that means bridging connections would be impossible. So instead we were suggested to cast our design in Plaster and then slip cast it in clay which I took to as I had the experience in both clay and working 3D fabrication.
The first step was to construct the positives for the Plaster Mold since time was short. I used Rhino to generate a model of our thermos that could be constructed by casting an inner and outer chamber. I also needed some sort of geometry that would allow me to fit it with a printed base and sealable cap after the thermos was baked which would shrink it substantially. I wrote a grasshopper definition so that all I would need to do is measure off the diameter of the thermos and two tabs at the top and bottom and it would generate a fitting for me. I initially tried a screw fitting however that would likely be damaged in the casting process and would be much harder to fit to so I swapped it out for the alignment beams.


One issue with the initial model was my screw cap wasn't designed properly however after using grasshopper that became easier, it was difficult to design it to match the tapered radius of the cup however using some subcurves and domain remapping I was able to change the radius of the spiral relative to how deep it goes into the cap. I added a tolerance variable to everything so that all the plastic would print to compensate for the nozzle squish as well I made the radius of the screw adjustable for any functional issues I might run into.
(With permission) I commandeered all 4 3D printers for the class and rushed the models in about 7 hours. Knowing the amount of tolerance I had for plaster molding and how less the final model shrunk I would have made it smaller and trimmed the margins much closer to save material.


The first slipcast didn't go over well as we didn't have enough slip so we ended up diluting it to properly fill the plaster but we didn't give it enough time to set so they ended up too thin to handle. The molds also started leaking everywhere because we had no clamps and the duct tape wasn't sticking so we had to squish clay into it.


So that evening Bryan aquired some extra slip and we recast it properly and they turned out more than successful. This time we shaved down the plaster so that they sealed flat as well as used some cargo straps to firmly secure them provided Peter, Bryan, and I all stood around for 15 minutes not understanding how cargo straps work.


After fusing the chambers and smoothing the surface it was up to drying it in time to bisque and glaze it. This is credit to Bryan for having this done within 2 days stopping by in the evening and afternoon to make sure it gets in with the last batches of the semester. The Thermos was fully baked a day before the presentation so I had to take measurements and start the prints that evening to be done overnight. I am missing photos of the final assembly but I adhered the plastic on as a temporary fit as I intended to later replace it with a food safe high heat plastic that would be usable possibly using this same method of casting only for a silicon fill as silicon can be food safe as well as resist boiling temperature. It ended up being that the temporary attachments became very temporary when Harrison tried to demonstrate the heat conduction and the heated water tore it from the cap and shattered it on impact.


Before I printed the model I took the vector file Mikey made for our brand logo and imprinted it into the lid. looking back I think I would've liked to print a positive of the logo in a contrasting colour and inserted into the imprint to make the logo more vibrant. Mikey did an outstanding job coming up with dozens of brand designs and possible aesthetics given we had more production time. He also included package design as well as marketing graphics that explain the function, polish the product, and garnish the brand.


 My team was very effective, everyone communicated and made available for discussion. While I focused on production they took care of the marketing and research for the project. Doing things differently I would have liked to have rushed the earlier weeks of the decision making processes so that I could have expanded on more interesting designs and produced better plastics like the silicon mold. I was much more conservative in the design partially as I was afraid of incorporating any details that could cause trouble as we had to rush the casting process otherwise I feel like it was a valuable experience and I think it has increased my investment into mixed media and 3D designing for enhanced production.
The first test build was using a conductive material to bridge heat from the inside of the material to the outer. For the proof of concept I constructed a cylinder made to hold a bottle with a steel wire contact attached via a hairband. A rudimentary search stated 45-50 degrees Celsius is the upper limit of what heat humans can handle. When testing with heat I quickly found that the PLA had reached what is called it's glass transition temperature where it is still solid yet has become flexible and malleable, this was also concerning as the hot water leached chemicals from the plastic and started emitting fumes and discolouring the water. I repeated the same attempt with a plastic cola bottle however more resilient it too began deforming from the heat and emitting worse fumes so I cancelled both. In place I tested it with a frozen water bottle attached to the conductive bridge which proved successful.

For week 2 I worked on building some models to work out the general design for fabrication.


What quickly became an issue discussed in the group was material access, price, and food safety. PLA is generally safe but not at high temperatures that would begin to weaken and degrade the material. There are food safe PLAs and PETG however the construction of a 3D printed thermos still had the issue of unsealed walls which would required a high temperature food safe coating. A possible medium was using thermocromatic paint which changes based on temperature however this had the issue of degrading rapidly without Ultra Violet protection as well even a few dozen ounces of the medium at the specified temperature is very expensive. For this reason I felt we simplify the design by using an indent however the other group members were adamant in trying other ideas like a compressible silicon button and combining the conductive material into the chamber so I did some test prints to demonstrate how it would be produced.

I had several concerns with this method. One was designing the 3D model to incorporate the material post print or mid print, second was how to best fuse the inner chamber back around the material, three was making these food safe ontop of accounting for the plastic print, four was this being a fault point for the cup after consistent use either the seal breaking or the material like the silicon simply cracking over repeated heating. As we moved towards a finished production in other materials simplifying the model became more urgent and mixing materials became extremely troubling due to alternating temperatures and different materials expanding and contracting. We wanted to use TPU as it's flexibility would absorb impacts and protect the ceramic from shocks, remember this for later.
We approached my instructor Bryan on if ceramic 3D printing was a possible for the Thermos design which we were informed would be impossible as ceramic slip requires exponentially more time to dry and become stable than Plastic takes to cool almost instantaneously and that means bridging connections would be impossible. So instead we were suggested to cast our design in Plaster and then slip cast it in clay which I took to as I had the experience in both clay and working 3D fabrication.
The first step was to construct the positives for the Plaster Mold since time was short. I used Rhino to generate a model of our thermos that could be constructed by casting an inner and outer chamber. I also needed some sort of geometry that would allow me to fit it with a printed base and sealable cap after the thermos was baked which would shrink it substantially. I wrote a grasshopper definition so that all I would need to do is measure off the diameter of the thermos and two tabs at the top and bottom and it would generate a fitting for me. I initially tried a screw fitting however that would likely be damaged in the casting process and would be much harder to fit to so I swapped it out for the alignment beams.
 |


One issue with the initial model was my screw cap wasn't designed properly however after using grasshopper that became easier, it was difficult to design it to match the tapered radius of the cup however using some subcurves and domain remapping I was able to change the radius of the spiral relative to how deep it goes into the cap. I added a tolerance variable to everything so that all the plastic would print to compensate for the nozzle squish as well I made the radius of the screw adjustable for any functional issues I might run into.
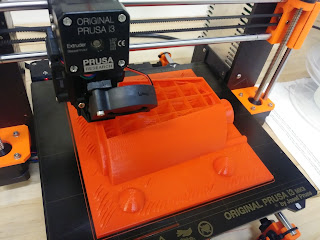
(With permission) I commandeered all 4 3D printers for the class and rushed the models in about 7 hours. Knowing the amount of tolerance I had for plaster molding and how less the final model shrunk I would have made it smaller and trimmed the margins much closer to save material.


The scaling of the print is cause by lack of internal support for the top layer to bind to which was the cost for making the margins so large and for reducing interior support to compensate.
Because the models scaled Bryan and I had to use a hot glue gun to meld the surface flat in order to stop plaster from catching onto it. We also sanded them with wood filler and spray painted them with primer in order to ensure it was water tight. We used foamcore for the walls of the plaster mold.


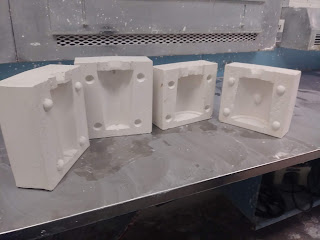
Bryan showed me some tips for Plaster molding. One was using vaseline to create a barrier between the positive and the plaster mold so it comes of smoothly. The other was watching for the plaster to start piling at the center of the water around which what looked to me like about half or maybe 2/3rds plaster to water. The positive molds being a rush print didn't hold up to the stress when removed which to me demonstrates the sunk cost of quality over efficiency.

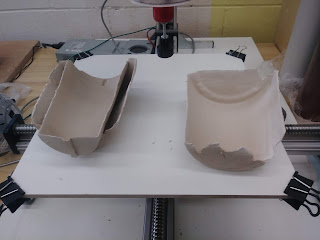
The first slipcast didn't go over well as we didn't have enough slip so we ended up diluting it to properly fill the plaster but we didn't give it enough time to set so they ended up too thin to handle. The molds also started leaking everywhere because we had no clamps and the duct tape wasn't sticking so we had to squish clay into it.


So that evening Bryan aquired some extra slip and we recast it properly and they turned out more than successful. This time we shaved down the plaster so that they sealed flat as well as used some cargo straps to firmly secure them provided Peter, Bryan, and I all stood around for 15 minutes not understanding how cargo straps work.


After fusing the chambers and smoothing the surface it was up to drying it in time to bisque and glaze it. This is credit to Bryan for having this done within 2 days stopping by in the evening and afternoon to make sure it gets in with the last batches of the semester. The Thermos was fully baked a day before the presentation so I had to take measurements and start the prints that evening to be done overnight. I am missing photos of the final assembly but I adhered the plastic on as a temporary fit as I intended to later replace it with a food safe high heat plastic that would be usable possibly using this same method of casting only for a silicon fill as silicon can be food safe as well as resist boiling temperature. It ended up being that the temporary attachments became very temporary when Harrison tried to demonstrate the heat conduction and the heated water tore it from the cap and shattered it on impact.


Before I printed the model I took the vector file Mikey made for our brand logo and imprinted it into the lid. looking back I think I would've liked to print a positive of the logo in a contrasting colour and inserted into the imprint to make the logo more vibrant. Mikey did an outstanding job coming up with dozens of brand designs and possible aesthetics given we had more production time. He also included package design as well as marketing graphics that explain the function, polish the product, and garnish the brand.


Comments
Post a Comment